

When the Christmas festival arrives and you start planning family gatherings, festive dinners, and cozy parties at home, getting your interior decoration just right makes all the difference. Welcoming guests with warm, handmade touches instantly elevates the holiday spirit without breaking the bank.
Today, I am covering 5 easy paper crafts to make beautiful 3D Christmas trees. You can place these decorative trees right on your dining table as a stunning centerpiece, on side tables for an extra festive flair, or even use them if you are organizing a community holiday event.
These crafts are wonderfully inexpensive, incredibly charming, and simple enough that you can easily involve children in making them. Crafting these together is a great way to let kids spark their creativity while building handmade holiday memories.
I am sure that you will enjoy making these five creative paper 3D Christmas tree crafts.
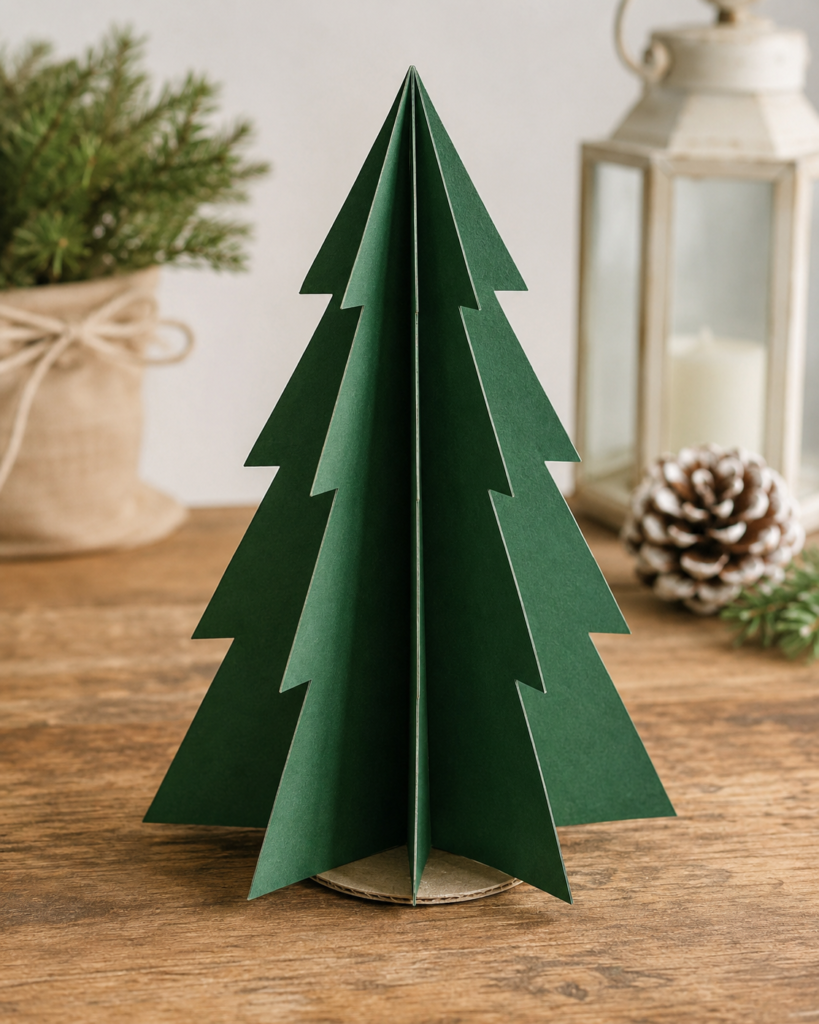
3D Christmas Tree Idea 1: Interlocking 3D Symmetrical Paper Tree
Materials
- Heavy green cardstock or decorative craft paper
- A sturdy cardboard circle for the base
- Craft glue or a hot glue gun
Equipment
- Scissors or a precision craft knife
- Pencil
- Ruler
- Bone folder for crisp creases
Instructions
Begin by selecting heavy green cardstock, which provides the structural stiffness required for a freestanding 3D sculpture. Measure and cut out multiple identical tree silhouettes, typically four to six matching pieces, to ensure the finished object has a balanced, symmetrical appearance from every angle.
Fold each paper silhouette precisely down the vertical center line, pressing along the crease with a bone folder so the fold remains sharp.
Apply a thin line of craft glue along one half of a folded piece, then press it firmly against the matching half of the next section. Continue joining the remaining matching silhouettes together in a sequential fan pattern until all exterior edges align symmetrically around a central vertical axis.
Before the final seam is completely secured, slip a small reinforced cardboard disk into the bottom interior to act as a weighted base, ensuring the sculpture stays upright on a flat surface.
Allow all adhesive joints to dry completely before gently fluffing and opening the individual paper panels outward to reveal a full, three-dimensional geometric pine tree shape.
3D Christmas Tree Idea 2: Stacked Accordion-Pleated Tiered Tree

Materials
- Vibrant green patterned or solid craft paper
- A thin wooden skewer or floral wire for the central trunk
- A small wooden spool or heavy cardstock box for the bottom base
Equipment
- Scissors
- Ruler
- Compass or circular tracing templates
- Hole puncher
Instructions
Trace and cut out a graduated series of paper circles, starting with the largest diameter for the bottom layer and decreasing in size by incremental half-inch steps up to the smallest top tier.
Take each circular paper piece and fold it repeatedly in half, quarters, and eighths to establish crisp radial crease lines, then accordion-pleat the sections tightly along those creases to form a compact, spring-like folded disk.
Punch a small clean hole directly through the exact center point of every folded paper disk using a hole puncher or craft awl.
Anchor the bottom of a thin wooden skewer securely into a weighted base, such as a heavy wooden thread spool or a folded cardstock block, using hot glue for maximum stability.
Slide the largest accordion-pleated paper disk down over the vertical skewer first, letting it expand slightly to form the wide lower branches of the tree.
Layer the remaining disks onto the skewer in strict descending order of size, pressing each tier down snugly against the one below it to create a dense, layered pine tree silhouette, and top the skewer with a small paper star or wooden bead.
3D Christmas Tree Idea 3: Rolled Fringe Needle Pine Tree

Materials
- Double-sided green construction paper or lightweight cardstock
- A sturdy brown paper straw or rolled brown cardstock tube for the trunk
- Craft glue
Equipment
- Scissors
- Ruler
- Pencil
Instructions
Cut long, uniform strips of green paper measuring approximately two to three inches in width, varying the strip lengths so you have larger pieces for the base and shorter strips for the upper canopy.
Use your scissors to cut fine, close vertical fringe along one entire long edge of each green paper strip, taking care not to snip all the way through the opposite solid margin.
Take a pair of scissors or a thin pencil and gently curl the individual paper fringe needles outward to give the foliage soft, natural dimension and volume rather than leaving the paper flat.
Apply a thin bead of craft glue along the uncut straight edge of the longest fringed strip, then wrap it tightly in a spiral fashion around the bottom of a sturdy brown paper straw or rolled cardstock trunk.
Continue wrapping and gluing progressively shorter fringed strips in ascending order up the length of the brown trunk, ensuring each new layer slightly overlaps the previous one to hide the seams.
Fluff the individual curled paper needles outward with your fingers to fill any gaps, and anchor the bottom of the completed brown trunk securely into a small cardboard or clay base so the tree stands upright.
3D Christmas Tree Idea 4: Rolled Cone Spiral Paper Tree

Materials
- Green patterned or solid craft paper
- A sturdy cardboard circle for the base
- Craft glue or double-sided tape
Equipment
- Scissors
- Compass or round template for tracing
- Pencil
- Ruler
Instructions
Begin by drawing and cutting out a large perfect circle from your green craft paper, with the desired diameter determining the overall height and footprint of the finished tree.
Use your pencil to draw a spiral path starting from the outer edge of the circle and winding inward toward the exact center point, keeping the width of the spiral band relatively uniform.
Carefully cut along the drawn spiral line using sharp scissors, creating a long, springy paper ribbon that tapers gracefully from a wide base down to a small terminal tip.
Take the wide outer end of the paper spiral and begin rolling it tightly upward around your fingers or a thin pencil, allowing the spiral to naturally coil into a steep, conical spring shape.
Apply small dabs of craft glue or secure points of double-sided tape at regular intervals along the coiled layers as you roll, ensuring the paper cone maintains its tension without unwinding.
Anchor the bottom edge of the completed paper cone onto a sturdy circular cardboard base using a generous amount of quick-setting craft glue.
Allow the adhesive to dry fully before shaping the top tip into a neat point, resulting in a lightweight, springy spiral tree that can be displayed individually or grouped into a miniature forest.
3D Christmas Tree Idea 5: Layered Petal Loop Christmas Tree

Materials
- Green and gold craft paper
- A small wooden dowel or floral wire for the stem
- A small wooden block or heavy cardstock base
- Craft glue
Equipment
- Scissors
- Ruler
- Pencil
- Tweezers for precise placement
Instructions
Cut numerous uniform paper strips measuring about half an inch wide and four to six inches long, sorting them into graduated length groups from longest to shortest.
Take each individual paper strip and fold the two ends inward so they overlap slightly at the center, gluing the ends together to form a series of closed, teardrop-shaped paper loops or petals.
Arrange your folded loops by size, and begin gluing the largest loops in a circle outward from the center base on a small flat cardboard disc to form the wide bottom tier of foliage.
Build subsequent rows upward by layering slightly smaller petal loops directly on top of the previous tier, staggering the overlap points to create a dense, textured pine needle effect.
Insert a short wooden dowel through the center of the stacked tiers to provide rigid vertical alignment, anchoring the bottom into a weighted wooden block base.
Top the completed evergreen structure with a small gold paper star or decorative bead, and let all glue joints set completely before handling or displaying your finished holiday decoration.
