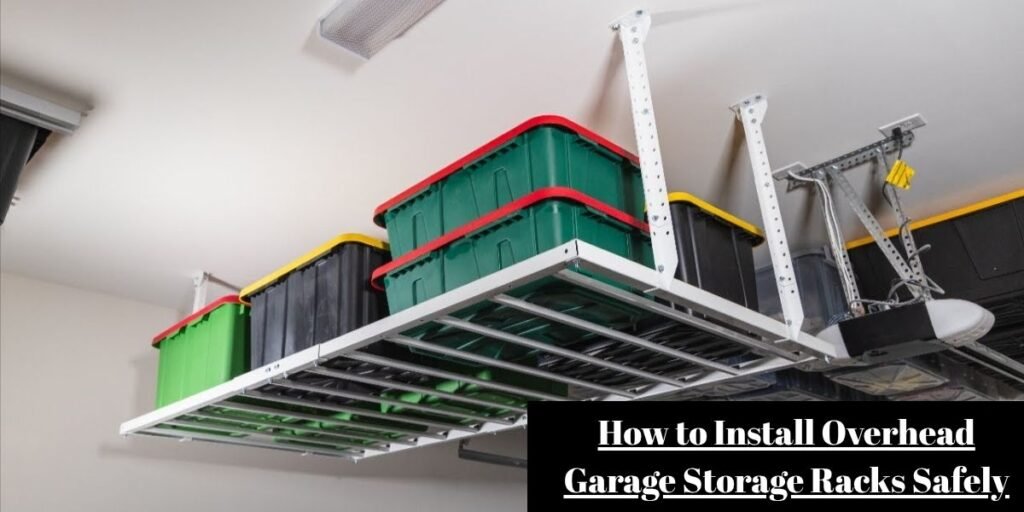
Installing an overhead garage storage rack is not a project you should tackle alone or approach like putting together an ordinary plastic shelving unit. You are suspending heavy cargo directly above parked vehicles and walking family members, which means a failed anchor point can result in catastrophic property damage or severe injury.
Mounting overhead storage requires precise alignment with ceiling framing, proper hardware selection, and realistic physical support during the build process because managing heavy steel rails and grid platforms overhead demands an extra pair of hands.
This guide is designed for those who plan to install their rack as a DIY project, ensuring your safety and helping you anchor the system so it can securely hold heavy storage weight for years to come. Because this is an overhead storage solution, it requires an exceptionally strong fit to prevent structural failure or future collapse.
I am sharing this workflow based on real-world installation scenarios, including the specific tools and support items you will need at each step to make the job easier and safer.
Start With the Garage Ceiling and Rack Requirements
Before drilling any holes into your ceiling, you must evaluate the structural realities of your garage. An overhead rack is only as secure as the ceiling framing and fasteners supporting it.
Start by identifying whether your garage features exposed wooden ceiling joists, finished drywall over wood framing, or concrete slab construction.
Next, inspect the exact layout of the structural framing. Standard residential garages typically feature wooden joists spaced 16 inches or 24 inches on center, and your rack brackets must align directly with these members.
Review the rack’s stated dimensions, mounting hole patterns, and certified weight capacity. A heavy-duty steel rack might support up to 600 pounds, but that rating assumes your ceiling joists and lag screws can handle that exact load plus the weight of the rack itself.
Finally, check whether the hardware supplied in the box is actually appropriate for your specific ceiling type. Manufacturers often supply standard wood lag screws, but if your setup differs, you will need to source rated structural hardware before starting.
Choose the Right Location for the Rack
Choosing the correct installation spot requires looking at how your garage functions on a daily basis. A location that looks completely clear when the garage door is closed can create an instant obstruction once the door mechanisms start moving.
Assess the following elements in your garage space before marking any mounting lines:
- Garage-door travel path: Ensure the rack remains completely outside the arc of the curved door tracks and extension springs.
- Automatic garage door opener: Leave sufficient clearance for the motorized rail and trolley arm when the door opens fully.
- Vehicle height and clearance: Confirm that open trunk lids, tall SUVs, or roof racks will not strike the bottom of the suspended storage platform.
- Lighting and electrical fixtures: Avoid blocking overhead lights, smoke detectors, or electrical ceiling outlets.
- Walking space and access: Position the rack where you can safely place and retrieve storage bins using a sturdy step ladder.
- Available ceiling framing: Align the prospective footprint directly beneath parallel ceiling joists.
Prepare the Ceiling and Mark the Mounting Points
Once you select the ideal location, you must accurately locate and map your ceiling framing. Never rely on guesswork or simple visual estimates when hanging overhead weight.
Use an electronic stud finder to locate the center of each ceiling joist within your marked layout area. Drive a small finish nail or thin pilot test bit through the drywall at suspected joist edges to confirm the exact center boundaries.
Match those framing locations directly with the mounting brackets of your storage system. Hold the ceiling brackets against the drywall or exposed joists, and use a pencil or a chalk line to mark every fastener position.
Check your diagonal measurements twice to ensure the layout is perfectly square before bringing out any power tools. If your rack mounting pattern does not line up naturally with your joist spacing, do not improvise a structurally questionable attachment simply to make it fit. You may need to install supplemental wood blocking between joists to create secure anchor points.
Assemble the Rack Before Installing It Overhead
Attempting to assemble an entire overhead storage rack while holding pieces against the ceiling is dangerous and inefficient. Most commercial systems are engineered for partial or substantial assembly on the floor.
Start by unpacking all components, sorting the hardware, and separating the ceiling brackets, vertical hanging posts, frame channels, and wire grid decking. Follow the manufacturer assembly sequence closely, connecting the main outer frame rails and securing the corner joints hand-tight initially.
Check that the frame is completely square by measuring diagonally from corner to corner; both diagonal measurements must match identically.
Because larger storage racks are bulky and awkward, you will need another person to help hold, lift, and position the frame during the mounting phase. Having a second set of hands prevents accidental drops, relieves strain, and ensures accurate alignment with your ceiling marks.
Secure the Rack to the Ceiling
Securing the rack to the framing is the most critical phase of the installation. Using the manufacturer specifications for fastener sizing and bracket spacing is non-negotiable.
Start by drilling pilot holes into the center of the ceiling joists at your marked points using the exact drill bit size recommended in your instruction manual. Undersized pilot holes can split wood framing when driving heavy lag screws, while oversized holes strip the wood and destroy holding power.
Position your ceiling mounting brackets over the pilot holes and fasten them securely into the structural members using the provided heavy-duty structural lag screws and washers. A socket wrench or impact driver makes this step manageable, but final tightening should always be checked by hand to ensure the fastener head sits flush against the bracket without over-torquing.
Next, attach the vertical support columns or hanging brackets to the ceiling mounts at your predetermined height. Raise the main rack frame into position with the help of your assistant, secure it to the vertical drops, and drop in the wire grid decking panels. Tighten every single bolt, nut, and set screw across the entire assembly.
Check the Rack Before Putting Anything on It
Before loading a single storage bin onto the newly mounted system, execute a thorough physical inspection. Never assume an installation is solid simply because the screws are tight.
Review the following safety and structural checks:
- Level check: Place a carpenter level across the frame rails to verify the entire platform is completely horizontal.
- Support alignment: Ensure all vertical hanging posts are plumb and sitting squarely in their connection slots.
- Fastener security: Double-check every lag screw and frame bolt to confirm zero play or wobble.
- Clearance check: Run the automatic garage door through a complete open-and-close cycle to verify it clears all frame edges and hanging brackets.
- Vehicle test: Pull your tallest vehicle underneath the rack with the trunk or tailgate open to confirm adequate vertical clearance.
Load an Overhead Rack the Safe Way
Once the rack passes inspection, loading it properly prevents structural overload and keeps your garage safe. There is a vital distinction between the structural capacity of the rack and the capacity of the ceiling framing supporting it.
Always stay well within the manufacturer’s stated weight limit, and remember that your ceiling structure may have a lower threshold than the rack itself. Distribute weight evenly across the entire platform rather than piling heavy items into a single corner.
Use durable, uniform plastic storage bins with secure lids to prevent items from shifting or spilling. Reserve the overhead space strictly for infrequently used seasonal items, holiday decorations, or lightweight camping gear. Keep excessively heavy automotive parts or dense objects down at floor level where they are easier to manage.
Never climb directly onto the storage rack, and ensure no stored items overhang the edges into the garage door travel path.
Installation Problems to Watch for
Encountering installation hurdles is common, but knowing how to address them prevents dangerous improvisations.
If your mounting brackets do not align with the ceiling joists, stop and install solid wood blocking between the joists rather than anchoring into drywall alone. When ceiling framing cannot be confidently identified, use a more powerful stud finder or inspect the attic space above.
If the rack is not level, adjust the height of the vertical hanging columns before tightening any frame bolts. If the rack is positioned too close to the garage door tracks or your vehicle lacks clearance, unbolt the hanging assembly and relocate it a few inches over.
When supplied hardware feels inappropriate for your specific framing or you notice any existing cracks in the wood, pause the project, source rated structural hardware, or repair the framing before proceeding.
When an Overhead Rack Needs Professional Installation
DIY installation is rewarding, but there are clear structural scenarios where you should stop and hire a licensed professional.
Call a contractor if your garage ceiling structure shows signs of water damage, sagging, or dry rot. Professional help is also required if your mounting layout cannot align with standard framing without major structural modifications, or if your garage features a reinforced concrete slab ceiling that requires specialized masonry anchors and hammer drills.
Do not attempt an overhead installation if the intended storage load exceeds what your home framing is engineered to support. Recognizing your limits protects your home and family.
Keep the Rack Secure After Installation
An overhead storage rack requires periodic maintenance to remain safe over years of service. Seasonal temperature swings and garage vibrations can cause fasteners to loosen gradually.
Inspect the visible lag screws and frame bolts at least twice a year. Look closely for any signs of frame movement, sagging, or bracket deformation.
Keep an eye out for component wear, especially if bins are slid across wire decking frequently. If you ever change the type of items stored overhead, reassess the total weight to ensure you remain safely below capacity. Regular visual checks take only a few minutes and provide long-term peace of mind.