

Geometry students frequently encounter interactive digital exercises where an unfinished proof sits on the screen alongside a pool of floating answer blocks. The task requires dragging those tiles into their correct positions within a traditional two-column proof format, matching specific mathematical claims with their proper geometric justifications.
Completing this assignment successfully requires far more than casual word-matching. Every single statement must follow an unbroken logical chain starting from the initial hypothesis and arriving precisely at the required conclusion, with each matched reason providing the exact mathematical theorem or definition that validates that specific step.
This guide breaks down the mechanics of the tile-sorting exercise, walking you through proper reading strategies, logical ordering principles, common geometric justifications, worked problem structures, and verification checks. You will learn how to approach these puzzles methodically so that every tile you drop into place reflects sound mathematical reasoning.
What Is the Assemble-the-Proof Geometry Activity?
Interactive drag-and-drop proof activities serve as modern instructional tools designed to teach logical deduction without requiring students to write every word from scratch. Instead of staring at a blank page, you receive a randomized bank of modular answer blocks containing mathematical expressions, segment congruences, angle measurements, and geometric theorems.
The workspace typically divides into two main sections. The Statements column holds the sequential claims that build the argument step by step, while the Reasons column holds the corresponding mathematical laws, postulates, or given facts that prove why each statement is true.
The draggable tiles represent the missing pieces of this puzzle. Your job involves selecting each tile, evaluating its mathematical validity within the context of the diagram and previous steps, and dropping it into its proper slot.
The exercise concludes only when every slot is filled with a matching pair that logically proves the final statement. Understanding how these columns interact prevents random guessing and ensures your completed proof stands up to rigorous mathematical scrutiny.
How to Assemble a Geometry Proof by Dragging Tiles Into the Statements and Reasons Columns
Read the Given Information and the Statement to Prove
Mastering any geometry proof begins long before you touch a single draggable tile. You must start by carefully analyzing the problem statement to separate the given facts supplied by the exercise from the target conclusion you are required to prove.
Examine every geometric diagram for critical markings. Look for tick marks indicating equal side lengths, arc marks showing congruent angles, arrows indicating parallel lines, and intersection points that suggest vertical angles or right angles.
A common student pitfall involves assuming a geometric relationship is true simply because the drawing appears to show it. You must rely exclusively on explicit diagram markings or statements labeled as given; never assume lines are perpendicular or segments are bisected unless the problem explicitly states so or marks it with standard geometric notation.
Write down your starting point and your finish line. Your very first statement in the proof will almost always be one of the pieces of information explicitly provided in the problem setup, and your final statement will match the exact conclusion requested by the prompt.
Arrange the Statements in a Logical Order
A geometric proof is essentially a narrative of logical cause and effect. You cannot use a mathematical conclusion in step four if the facts supporting it are not established until step six, meaning the sequential arrangement of your statements dictates the entire validity of your work.
Build your argument outward from the given facts. Look at your available statement tiles and identify which ones can be deduced immediately from the starting information using basic definitions or postulates.
Intermediate conclusions act as stepping stones across a river. For example, if you are proving two triangles congruent, you must first establish that specific pairs of corresponding sides or angles are equal before you can invoke a triangle congruence postulate like SAS or ASA.
Keep your eye on the destination. Every intermediate statement you select should bring you one step closer to the final target statement, eliminating clutter and keeping your logical progression tight and focused.
Match Each Statement With the Correct Reason
Once your statements are sequenced correctly, every single claim must be anchored by a legitimate mathematical justification. The reason tile must provide the universal rule or given fact that guarantees the statement beside it is undeniably true.
Common foundational reasons include:
- Given: Used for the initial hypotheses supplied at the start of the problem.
- Midpoint Definition: Establishes that two segments are equal because a point divides a line segment into two congruent halves.
- Vertical Angles Theorem: Proves that intersecting lines form opposite angles that share equal measurements.
- Parallel Line Properties: Includes alternate interior angles, corresponding angles, and consecutive interior angles formed by a transversal.
- Triangle Congruence Postulates: Covers core theorems like SSS, SAS, ASA, and AAS used to prove geometric shapes identical.
- CPCTC: Stands for Corresponding Parts of Congruent Triangles are Congruent, utilized as a concluding step after triangles are proven identical.
Select only the rules that apply directly to your specific puzzle. Do not attempt to force a favorite theorem into a slot where the geometric conditions have not been met.
Place the Tiles and Complete the Proof
With your strategy mapped out, execute the physical sorting process by dragging each tile into its designated row and column. Ensure that your placement respects both horizontal agreement and vertical sequencing, where each step flows naturally from the one above it.
Modern digital interfaces often allow you to reorder tiles freely after initial placement. Take advantage of this flexibility by reviewing your entire completed table from top to bottom before hitting the submit button.
Check for alignment errors. A frequent mistake involves pairing a correct statement tile with a mismatched reason tile that sits in the same row; verify that the mathematical operation described in the statement is explicitly governed by the law named in the reason.
Once your sequence flows smoothly from the initial given facts to the final proven conclusion, your proof assembly is complete.
Worked Example: Completing the Statements and Reasons
Abstract rules and theoretical steps become much easier to digest when applied to a concrete geometric scenario. As illustrated in the problem panel, we are tasked with proving that the base angles of an isosceles triangle are congruent using side-angle-side congruence and an angle bisector.
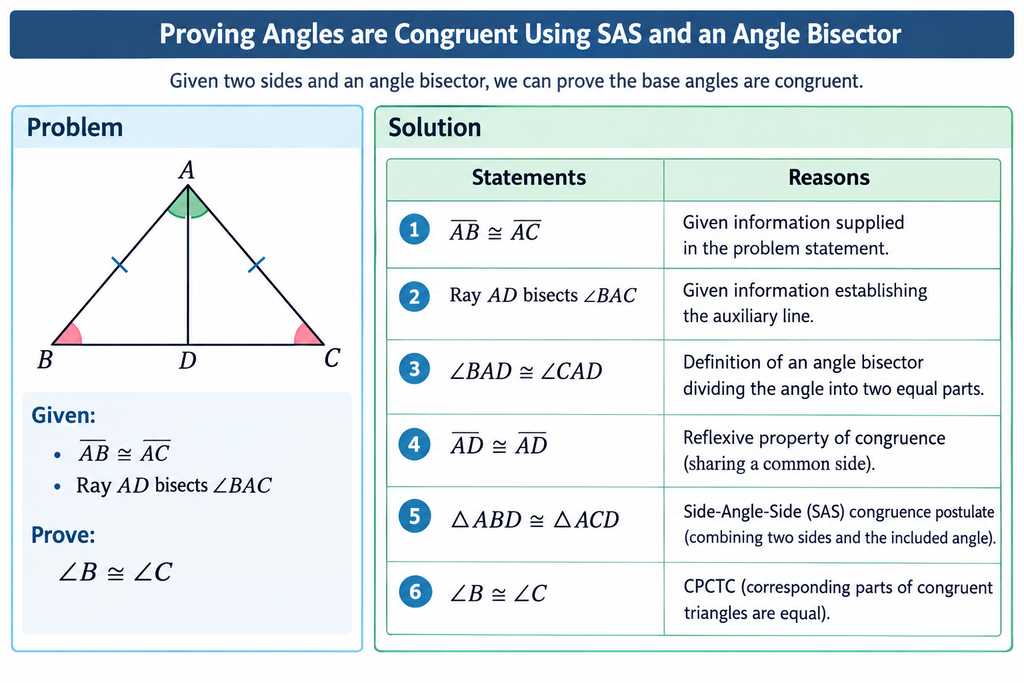
The problem box explicitly provides the setup:
- Given: AB≅AC and Ray AD bisects ∠BAC.
- Prove: ∠B≅∠C.
The accompanying diagram displays triangle ABC with vertex A at the top, base points B and C along the bottom, and point D between them where an interior angle bisector line drops straight down from vertex A. Tick marks indicate that side AB matches side AC, while green arc marks at vertex A show the bisected angles and pink arc marks at vertices B and C highlight the base angles.
A properly assembled two-column proof for this configuration aligns specific claims with their corresponding mathematical justifications as shown in the solution table:
| Statements | Reasons |
| AB ≅ AC | Given |
| Ray AD bisects ∠BAC | Given |
| ∠BAD ≅ ∠CAD | Definition of Angle Bisector |
| AD ≅ AD | Reflexive Property |
| △ABD ≅ △ACD | SAS Postulate |
| ∠B ≅ ∠C | CPCTC |
Every step in this sequence fulfills a strict logical requirement. The first two statements rely entirely on the hypothesis supplied in the problem block, while the middle steps build intermediate conclusions through angle bisectors and shared reflexive sides that ultimately unlock the final triangle congruence and its resulting angle equality.
How to Check Whether the Completed Proof Is Correct
Submitting a digital assignment without verifying your sequence is a fast way to lose points on a minor technicality. Before locking in your answers, run through a rapid, four-point verification check to ensure your proof holds together under logical inspection.
- Check the starting point: Does your very first statement row originate directly from the given information supplied in the exercise prompt?
- Check each justification: Does the reason tile sitting in the right-hand column explicitly prove the statement directly to its left, or does it apply to a completely different geometric property?
- Check the sequence: Are your intermediate facts established before you reference them in later steps, or are you putting the cart before the horse?
- Check the conclusion: Does your final statement row prove exact compliance with the target goal requested by the exercise?
Remember that a visually neat table does not guarantee a valid proof. A sequence can look balanced while containing fatal logical flaws if a theorem is invoked prematurely or without proper foundational support.
Common Errors When Matching Statements and Reasons
Even proficient mathematics students stumble on specific traps embedded within drag-and-drop proof activities. Recognizing these frequent errors helps you self-correct before submitting your work.
- Selecting a superficially similar theorem: Choosing a reason that sounds related to your statement but requires different geometric conditions, such as confusing SAS with SSA (which is not a valid congruence shortcut).
- Confusing a theorem with its converse: Applying a rule backward, such as assuming lines are parallel because alternate interior angles are equal when you are actually trying to prove they are equal.
- Relying on visual assumptions: Assuming two segments are equal or perpendicular simply because they look balanced on the screen, without supporting evidence from diagram markings or given text.
- Using conclusions out of order: Invoking a property or segment length before establishing the intermediate steps required to prove it exists.
- Misaligning rows: Placing a correct statement and a correct reason in the same puzzle but putting them on different rows, breaking the horizontal link required for validation.
By keeping these pitfalls in mind and verifying your logical chain step by step, you can approach any tile-sorting geometry proof with absolute confidence.
Conclusion
Mastering the art of assembling a geometry proof through drag-and-drop tiles requires treating the exercise as a structured dialogue rather than a matching game. Every statement you select must earn its place by following an unbroken logical chain straight from the initial hypothesis to the final required conclusion.
By carefully analyzing diagram markings, verifying that each reason mathematically justifies its paired claim, and avoiding common sequencing traps, you transform digital puzzles into reliable demonstrations of logical deduction. Use the worked example and verification checklist in this guide as your operational blueprint whenever you face a new geometry proof.