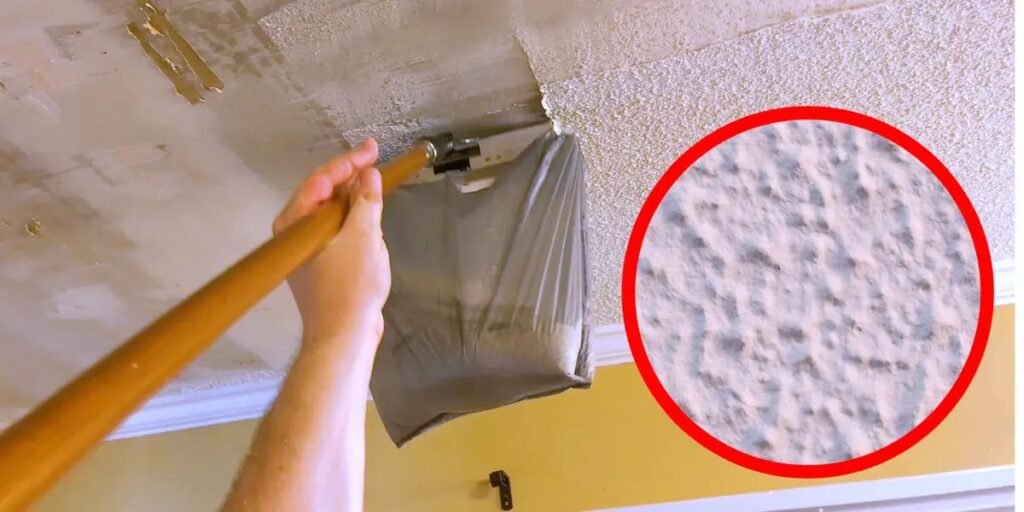
Removing acoustic texture transforms a dated, light-swallowing room into a clean, modern space almost overnight. Having stripped more than a few of these ceilings over the years, the job is won or lost in the prep and testing phase, not the scraping. Executing a successful popcorn ceiling removal involves far more than simply running a blade across the ceiling. It requires evaluating structural safety, sealing the work area, stripping material without tearing the underlying drywall paper, and executing precise surface repairs before a drop of paint goes on.
Homes built before 1979 frequently used acoustic ceiling materials that contained spray-applied chrysotile asbestos fibers, prized at the time for fire resistance and sound dampening. The EPA restricted new spray-applied asbestos surfacing materials in 1973 under the Clean Air Act’s asbestos NESHAP rule, and the Consumer Product Safety Commission tightened restrictions further in 1977. However, contractors were legally allowed to install existing inventory until it ran out, so ceilings textured well into the mid-1980s are still fair game for testing. Disturbing an unverified textured ceiling can release microscopic fibers that stay airborne for hours and settle deep into carpet and HVAC systems. Testing the substrate isn’t a suggestion; it’s a mandatory first step before a scraper ever touches the surface.
Before Removing the Popcorn Ceiling
Evaluating the substrate before buying a single tool is what separates a clean weekend project from a costly mid-job shutdown.
The primary consideration is testing for hazardous materials. Hire an EPA-certified asbestos inspector, or collect a small sample yourself following the EPA’s guidance for bulk sampling by wearing a respirator, misting the area first, and bagging the sample immediately. Send it to an NVLAP-accredited lab for polarized light microscopy analysis. Results typically arrive within three to five business days and usually cost between $30 and $80 per sample. If the lab reports any percentage of asbestos, or the results are inconclusive, stop immediately. Do not scrape, sand, or disturb the material. At that point, you are looking at encapsulation or licensed abatement, not a DIY weekend.
Next, determine whether a previous owner painted over the texture. This matters more than most homeowners realize. Even a single coat of oil-based or latex paint forms a semi-waterproof film that keeps water from softening the acoustic material underneath, which changes your entire approach later in the project.
Inspect the surface with a high-lumen work light held at a raking angle to locate existing structural cracks, water stains, sagging joists, or loose drywall tape hiding under the texture. These flaws are far easier to spot and mark now than after the ceiling is stripped and covered in wet debris.
Finally, decide whether physical scraping is genuinely the most practical restoration method for your ceiling’s condition. A heavily cracked, multi-layer, or water-damaged ceiling is often better served by a skim coat or a drywall overlay.
What You’ll Need
Gathering the right equipment upfront ensures the job proceeds without a mid-project hardware store run. With a ceiling this messy, that trip usually happens while dripping wet debris across a car seat.
Tools
- Garden pump sprayer
- 10-inch or 12-inch wide ceiling scraper or flexible taping knife
- Wide drywall joint knife
- Sturdy extension ladder
- Pole sander with 120-grit and 220-grit sanding mesh
- Sharp utility knife
- Portable LED work light
Materials
- Heavy-duty 2-mil or 3-mil plastic sheeting
- Canvas drop cloths
- Professional-grade painter’s tape
- Lightweight setting-type joint compound like Easy Sand 90
- Medium and fine sanding sponges
- High-hide PVA drywall primer using a stain-blocking formula like Kilz or Zinsser
- Flat acrylic ceiling paint
Protective Equipment
- NIOSH-approved N95 or P100 particulate respirator
- Sealed safety goggles
- Disposable protective coveralls with hood
7 Steps to Remove a Popcorn Ceiling
1. Protect the Room Before You Start
Preparation determines both the speed and the cleanliness of this project, and it is the step most first-timers rush. The acoustic texture becomes surprisingly heavy, sticky, and mud-like once saturated with water. A 12×15-foot ceiling can shed 40 pounds or more of wet debris, so thorough protection isn’t optional.
Clear all furniture from the room. If large pieces can’t be removed, push them to the center and wrap them completely in plastic sheeting, sealing the seams with tape.
Cover the entire floor with plastic sheeting, running the material 6 inches up each wall and taping it in place. Lay heavy canvas drop cloths over the plastic along main walking paths. Plastic alone gets slick fast once it is wet, and a fall off a ladder onto a plastic-covered floor is how most DIY injuries on this job happen.
Shut off electrical power to the room at the main breaker panel, not just the wall switch. Remove all light fixtures, ceiling fan blades, and cover plates, and mask exposed electrical junction boxes with painter’s tape to keep water out of live wiring components.
2. Wet a Small Section of the Ceiling
Controlled moisture application breaks down the water-soluble binders holding the acoustic material to the paper facing of the drywall. This is the entire mechanism behind wet scraping, and rushing it is the single most common reason people gouge their ceilings.
Fill a garden pump sprayer with clean, warm water, as warm water penetrates the binder faster than cold. Adjust the nozzle to a fine mist rather than a direct stream, which can blast texture across the room without softening it evenly.
Mist a manageable section, roughly 4 feet by 4 feet, and let the water soak in for 10 to 15 minutes. Working smaller sections than this wastes time, while working larger sections means the first area dries out before it meets the scraper.
Check the absorption by pressing the material lightly with a fingertip. It should feel soft, spongy, and slightly darker in color. If water beads up and runs off instead of soaking in, the ceiling has almost certainly been painted, and you will need the approach outlined later under painted ceilings.
Resist the urge to oversaturate. Excess water weakens the drywall core, causes the paper facing to delaminate, and can dissolve the joint tape underneath, turning a cosmetic project into a full drywall replacement job.
3. Scrape Off the Popcorn Texture
Proper tool handling lets you remove material quickly while keeping the drywall paper underneath fully intact.
Position the ladder to work directly overhead without overreaching or twisting the torso. Most missed spots and gouges happen when someone stretches sideways instead of repositioning the ladder. Hold a wide ceiling scraper at a shallow 30-degree angle against the surface.
Apply gentle, steady forward pressure, letting the blade glide between the damp acoustic material and the paper facing rather than digging into it. Catch falling debris in a mud pan or shallow tub held just beneath the scraper. It dramatically cuts down on floor cleanup and keeps wet texture from tracking through the house.
If the blade catches or starts biting into the paper, stop immediately. Flatten the blade angle and ease off the pressure. A torn face paper here means a repair later, so it is worth the extra thirty seconds of care. Work in small, overlapping passes across the room until every unpainted section is stripped clean.
4. Check the Bare Ceiling for Damage
Removing acoustic texture reliably exposes construction flaws that have been hidden since the house was built. Nail pops, hairline cracks, and old repairs are the norm, not the exception.
Let the bare drywall dry completely for at least 12 to 24 hours before inspecting it. Damp drywall can hide flaws that only become visible once fully dry.
Set up a bright LED work light at a shallow, raking angle across the ceiling. This low-angle lighting throws shadows across ridges and valleys that are invisible under flat overhead light. Professional finishers rely on this trick constantly, and it makes the difference between a smooth ceiling and one that looks fine until the sun hits it sideways.
Inspect closely for deep blade gouges, torn face paper, rusted or protruding fastener heads, and loose joint tape at the seams. Mark every flaw with a soft pencil as you find them, as it is easy to lose track of a small gouge once mixing compound begins.
5. Repair and Skim-Coat the Surface
Creating a smooth, uniform plane at this stage is what makes the final paint job look professional instead of patchy.
Trim away any loose or frayed drywall paper around gouges with a sharp utility knife. Feathering these edges now prevents bubbling once the compound goes over them.
Apply a setting-type joint compound, such as Easy Sand 90, over deep gouges, open seams, and exposed fastener heads using a 6-inch drywall knife. Setting-type compound is worth the extra cost over standard pre-mixed mud because it shrinks less and allows recoating the same day instead of waiting 24 hours between coats.
Once repairs are solid, apply a thin skim coat across the entire ceiling with a 12-inch taping knife to level out minor texture remnants and blend old repairs into the surrounding surface.
Let the compound cure fully per the manufacturer’s instructions, which is typically 90 minutes for setting-type compound and longer in humid conditions.
Fit 120-grit sanding mesh to a pole sander and knock down high spots, then follow with a 220-grit pass to remove sanding scratches. Wear a respirator through this step, as drywall dust is a respiratory irritant even without asbestos in the mix.
6. Prime the Ceiling
Bare drywall paper and freshly applied joint compound absorb liquid coatings at noticeably different rates. Skipping primer is the most common reason a finished popcorn-removal ceiling shows blotchy, flashing patches after painting.
Wipe the entire ceiling down with a damp microfiber cloth or tack cloth to remove fine sanding dust. Paint applied over dust never bonds properly and will peel prematurely.
Roll on a high-quality, high-build PVA drywall primer with a medium-nap roller, working in full sections to avoid lap marks.
A PVA-based primer seals porous joint compound, blocks residual staining from old water marks, and gives the topcoat a uniform surface to grip. This single step does more for the final look than an extra coat of paint ever will.
Once the primer is dry, inspect the ceiling again under bright light. The flat, uniform white finish makes any remaining flaws obvious, so this is your last real chance for touch-up sanding before paint locks everything in.
7. Paint the Ceiling
The final step is applying a durable, flat finish coat that ties the whole repair together into a seamless surface.
Pour flat acrylic ceiling paint into a roller tray. Flat sheens scatter light rather than reflecting it, which is exactly why they are the standard choice for ceilings. A satin or eggshell finish would highlight every minor imperfection in the skim coat instead of hiding it.
Cut in along the wall edges and corners first with a 2.5-inch angled sash brush. Then roll the main field in contiguous 3-foot by 3-foot sections, always maintaining a wet edge to avoid visible lap marks once it dries.
Let the first coat dry for about 4 hours, then apply a second coat perpendicular to the direction of the first. This cross-hatching evens out roller texture and ensures full, opaque coverage.
Once the paint has fully cured, remove the masking tape, reinstall the light fixtures, and pull up the floor protection.
If the Popcorn Ceiling Has Been Painted
Painted acoustic texture is a genuinely different problem, not just a harder version of the same one. Latex or oil paint creates a waterproof film over the porous material, so standard misting simply beads on the surface instead of soaking in. Forcing a wet scrape at this point tends to tear the drywall paper rather than lift the texture.
Test a small section by scoring the texture lightly in a crosshatch pattern with a utility knife before spraying any water. The score lines give moisture a path through the paint layer down to the water-soluble glue holding the texture on. If scoring and misting still don’t soften the material after 15 to 20 minutes, mechanical dry scraping with a vacuum-assisted hand tool is usually the next option, since it controls dust far better than an unassisted dry scrape.
A thick coat of a chemical paint stripper formulated for masonry and drywall can also break down stubborn latex coatings enough to allow safe removal. When painted texture simply won’t soften no matter what you try, forcing it usually ends in destroyed drywall. At that point, skim-coating directly over the existing texture, or hanging new 1/4-inch drywall panels over the ceiling, is almost always the faster and less destructive route.
When Scraping Isn’t the Right Choice
Direct scraping isn’t the best method for every ceiling, and knowing when to walk away from it saves both time and money. If lab results confirm asbestos, mechanical scraping releases dangerous fibers into the air regardless of technique. This makes controlled encapsulation or licensed abatement the only responsible path forward, as this is not a DIY situation under any circumstances.
Ceilings carrying multiple layers of old paint demand enormous physical effort to scrape and very often end in significant substrate damage no matter how careful you are. Ceilings with extensive water staining, sagging boards, or failing joint tape are, in most cases, better and more economically restored by covering rather than stripping.
In rooms with adequate ceiling clearance, hanging 1/4-inch or 3/8-inch drywall panels directly over the existing texture saves substantial labor while delivering a perfectly flat surface with none of the dust, mess, or asbestos risk of scraping.
How Long Does It Take to Remove a Popcorn Ceiling?
A typical 12-foot by 15-foot room usually takes 2 to 3 full working days from initial prep through the final coat of paint, assuming no asbestos testing delays or surprise repairs.
Preparation, masking, and isolating the room generally take 2 to 3 hours. Misting and scraping the texture itself takes another 3 to 5 hours, followed by a mandatory 12 to 24 hours of drying time before safely assessing the bare substrate. Patching and skim coating add another 3 to 4 hours of hands-on work, with the joint compound needing 12 to 24 hours to cure fully. Sanding, dust removal, priming, and applying two coats of paint round out the remaining 6 to 8 hours of active labor.
Actual timelines shift with room dimensions, ceiling height, ambient humidity, and how much drywall patching the ceiling ends up needing once exposed.
Questions About Removing Popcorn Ceilings
Can I remove a popcorn ceiling myself?
Yes. An experienced DIYer can remove unpainted acoustic texture with basic tools and a weekend of patience, provided the material has been tested and confirmed free of asbestos first. If you are not confident evaluating structural damage or handling drywall repair, hiring a local drywall contractor for the patch-and-paint phase is a reasonable middle ground.
Do I need to test a popcorn ceiling for asbestos?
Yes, and this applies to any home built before roughly 1990. Asbestos fibers can’t be identified by sight, texture, or age alone. Laboratory analysis of a physical sample under polarized light microscopy is the only reliable method, and it is inexpensive insurance against a serious health risk.
Can I remove a painted popcorn ceiling?
Yes, but expect extra steps. Scoring the surface, applying chemical stripper, or using vacuum-assisted dry scraping are typically required to get past the paint barrier before the underlying glue will release.
Do I need to skim the coat after scraping?
In nearly every case, yes. Scraping acoustic material exposes factory drywall seams, minor gouges, and paper texture that a skim coat is needed to smooth into an even, paint-ready surface.
Can I paint directly over the ceiling after removing the popcorn?
No. Bare drywall paper and patched joint compound absorb paint at different rates, which causes an uneven sheen known as flashing. A dedicated PVA drywall primer evens out that absorption and prevents peeling or blotching once the topcoat goes on.